|
Jukka Tervamaki, Sept 10, 2000 |

|
Since the laminating procedure is a pretty messy business I never took photos of the actual work. Instead I am using schematic pictures made using ClarisDraw and form•Z programs.
What are the characteristics of a composite propeller:
1) Easy to fabricate.
2) Mold can be made using an existing metal or wooden propeller as a plug.
3) By making the mold flexible and adjustable props with slightly different pitch values can be made
4) A fiberglass/epoxy propeller is about 50 to 70 percent heavier than a wooden prop but is lighter than a metal prop.
5) The weight difference results in different torsional vibration characteristics in power plants having a reduction drive.
6) A composite prop is much stronger than a wooden propeller.
What are the drawbacks of a composite propeller:
1) It may be too strong! In an aircraft with retractable gear a belly landing may result in a damaged crankshaft.
2) However, the leading edge of the prop is not as hard as metal.
Therefore, grit and gravel will damage the leading edge of the prop. A
pusher prop in particular needs continuous maintenance on dirt air
strips.
3) The hub of a composite propeller may shrink if made of poor plastics
and if the prop flange gets too hot (eg pusher propellers).
THEREFORE, NOTE THE FOLLOWING!
1) Dont use polyester resins, they are not heat resistant. Always use the best heat resistant epoxies.
2) With
epoxies watch that the mixture ratio of resin and hardener is correct,
otherwise the propeller will not cure completely and may get soft when
heated by propeller flange.
3) To prevent shrinking, post cure a composite prop to at least 70...80 degrees C.
4) Use a heat insulation plate between hub flange and prop if the flange gets very hot when the engine runs for hours.
5) Use an epoxy with a reasonably long pot life (several hours). This
will prevent the thick laminates from overheating and getting
discolored when curing.
MAKING THE PROPELLER MOLD.
1)
Make a copy of the propeller flange in steel or aluminium and bolt it
onto the curved side (pusher side) of the prop serving as a plug. In
some cases like VW based engines you can use the original prop flange.
2) Make support plates of 1 mm aluminium for the flat side of the prop
blades. Use tape to fix them on the flat side of the blades.
3) Carefully apply a release agent (usually wax) on the prop. The
flange does not need a release agent if it is permanently bonded onto
the mold. However, if you are using the original flange be sure to tape
and wax it over to be able to remove it later on from the mold. .
4) Apply gelcoat on the surfaces.
5) Laminate10....20 layers of bidirectional fabric using preferably
epoxy resin onto the prop/flange assembly. If you want to adjust the
pitch of the prop do not make the mold too thick and torsionally too
stiff.
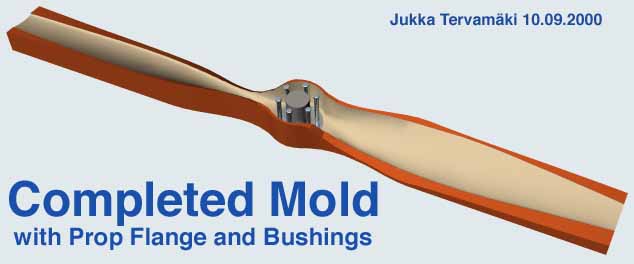
6) Let the laminate cure. Postcure the mold at elevated temperature as necessary.
7) Remove the original propeller from the mold.
8) Cut and clean the mold edges.
9) Fix the mold on a sturdy plank and build the pitch adjusting
mechanism for each blade ( Minimum two positions per blade.)
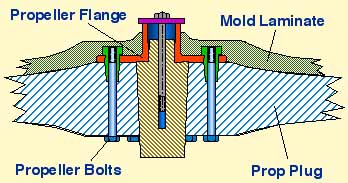
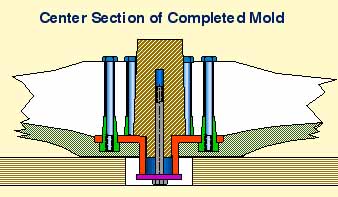
10) Since we are not going to cut laminated fibers by drilling holes
for the propeller bolts but instead will use metal bushings you can
reduce the propeller hub diameter and increase the central hole
diameter thereby reducing the space in the hub to be filled with
laminate. You can do this by casting glass/epoxy stuff on the walls of
the hub using a round plastic bottle as a template (plug) and by making
a large conical plug for the central hole in the prop.
When the mold has been completed take the following steps to make a composite propeller:
1) Calculate the desired pitch of the propeller at .75 R and at the tip. You may try the various propeller design programs in the net. Adjust the pitch screws as necessary.
2) Apply release agent (wax) on all surfaces of the mold except the insert bushings.
3) Roughen the surfaces of the insert bushings and bolt them on the prop flange in the mold.
4) Laminate 3 layers of bidirectional fabric on the mold. Make the necessary holes for the insert bushings.
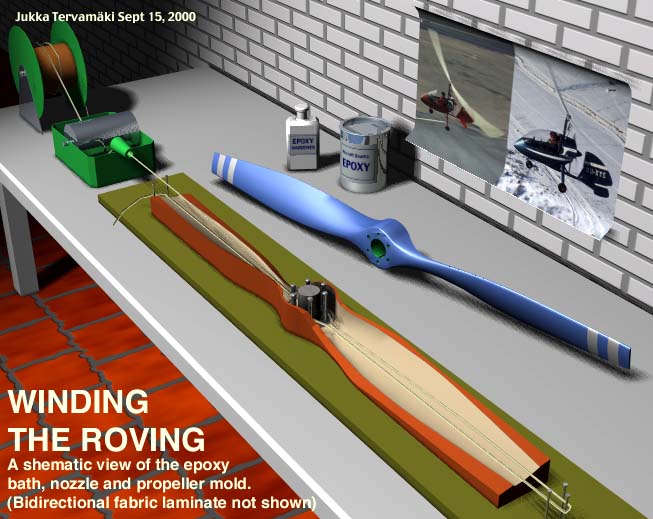
5) Fill the mold with unidirectional glass roving using a kind of
filament winding method. By pulling the roving through an epoxy bath
and a nozzle which squeezes out the extra epoxy the work will be quite
fast. You can wind the first rounds of roving around nails at the end
of the blade tips. Look at the picture below. When the blade tips are
full, continue with ever decreasing lengths of rowing. Use randomly
varying routes of rowing around the hub insert bushings.
6) Fill the remaining empty spaces in the propeller hub area with
chopped glass/epoxy mixture. You can use glass microballoons, too
7) When the mold is nearly full, laminate 3 to 5 layers of bidirectional fabric on top to fill the mold.
8) Let the epoxy cure as per the epoxy specs.
9) Remove the prop from the mold and finish the edges and the flat surface by filling, grinding, filing and wet sanding.
10) Check the balance of the prop. Continue finishing until the prop is in balance.
11) Postcure the propeller in an oven to 70....80 degrees C.
12) Give it a final touch by painting the propeller. Check the balance after painting.
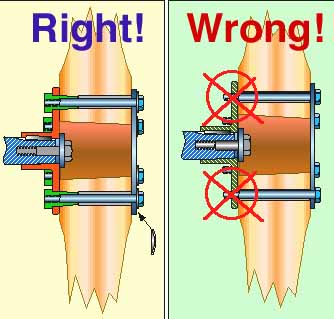
The picture below shows the right and wrong method to install the propeller on the flange. It is dangerous to install the propeller so that the thin threaded portion of the bolts will carry all the torque loads. The propeller flange must have long nuts to carry the torque loads. In addition, use conical spring washers under the bolt heads to prevent any play from arising if the propeller shrinks due to an exessively hot flange.

COMMENTS
I've just found your composit propeller page and want to tell you my compliments. It is a wonderful page.
However, I like to say that there is a third way of bolting the prop
through the hub, the way Lycoming, Fraklin and Continental do it with
the wooden and metal propellers. You got the bolt through the rear of
the hub and have the thread through the front of the propeller like
studs to use castle nuts to thighten the assembly by help of a
coverplate to the hub. (If there is enough space to get the bolts
through from the rear.)
Go ahead and publish more of such great pages.
Best regards,
Christian
Great
prop making ideas. I added a link to your site on our site. I might
suggest you orient the carbon cloth plus and minus 45 degrees for
increased torsional blade stiffness. Also use a metal blade as a mold
when ever possible to take advantage of the increased prop efficiency
afforded by the thinner blade. Thanks for doing that. Many of our
readers need that sort of information.
Paul Lamar
The AirCraft Rotary Engine NewsLetter.
http://home.earthlink.net/~rotaryeng/
I
read you very informative article on the composite prop. I have one
question about post curing. I have been looking for plans or ideas to
build a home made oven for post curing.
Ameet Savant
I
live in sunny Australia land of Kangaroos and Koala bears. I have had a
bit of look around your website with great interest even the prop
design section it is amazing to see how easily people pick up on
things. I have been building props for homebuilt aircraft for nearly 20
years in wood and composite I use viynl ester resin for my propellors
good information you have provided the layman well done.
Tom Wickers
I
thank you so much to access an interesting page Making a Composite
Propeller from your web site. Although I am do research with prosthetic
limbs and related hardware, I am trying to fabricate a required
flexible L shaped composite strip, I can send a photo later.
Rabinder Sahni
| Composite Propeller | Safety | Hobbies| Site Map